The installation of different versions of Windows systems on the same computer (even multiple Windows of the same version) constitutes a Windows multi-system. Multiple systems are represented and accessed through multiple system menus. How to generate a multi-system menu, how to edit it at will, and how to retrieve the multi-system menu after it is lost, all of which prompted us to understand and further grasp the Windows multi-system menu.
1. Windows multi-system startup menu generated
The most direct way to create a multi-system menu is to run another higher-level system installation program in a single system. Do not choose to upgrade and install the new system to another partition. After the installation is complete, multi-system startup will be automatically generated. menu. Although the above method is simple, but the process of installing the system uses the most traditional installation method, the process is relatively slow, especially the middle of the installation process of the lower version of Windows is more troublesome and takes longer. In addition, installing older versions on top of existing high versions will not work for multiple systems. At this time, you need to use third-party tools to assist in installation, such as using BOOTICE, BCDEDIT, VHD_VHDX, and other auxiliary processing tools to add multi-system menus.
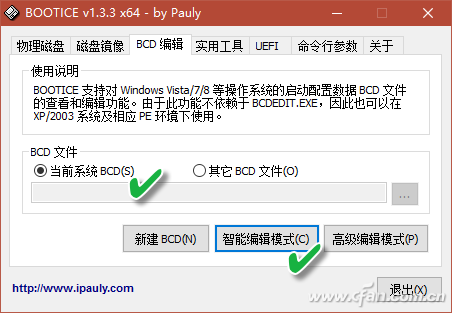
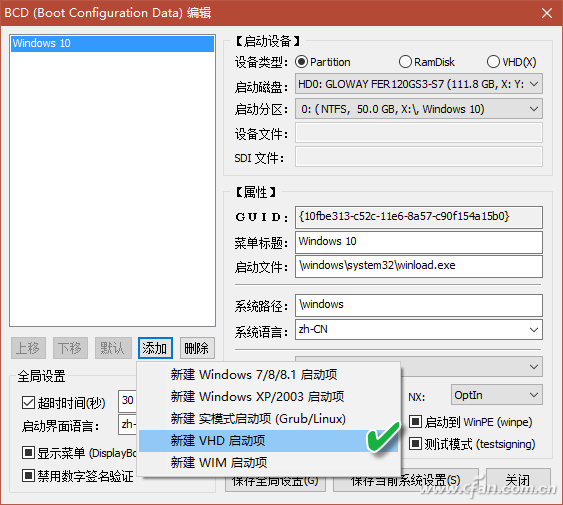
For example, to build a VHD virtual system using a system disk management tool for a newly-previewed version of Windows 10's ISO installation package, you want to add the system to an existing Windows system to form a dual-system boot menu. At this time, you can use BOOTICE to add. Select "Current System BCD" option under BOOTICE "BCD Edit" tab and click "Smart Edit Mode" (Figure 1); in the next window, click "Add → New VHD Startup" (Figure 2) ; Then set the boot device type to VHD, select the actual location of the boot disk and partition where the VHD file is located, enter the actual path and file name of the VHD, customize the name of the menu title, other options can be selected by default or make appropriate modifications, and then click "Save current system settings" (Figure 3). In this way, the dual-system menu is generated, and the system is restarted to enter the newly added system, and the system is initialized and set up.
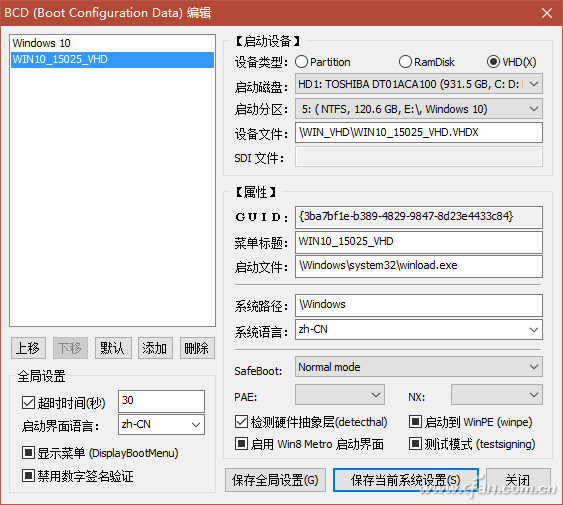
Add a non-virtual entity system or a RamDisk-type virtual system menu in the same way as above. Just select the device type Partition or RamDisk, and make the appropriate settings.
Tip: Add VHD files to the boot menu in command mode
Mount the VHD first (assuming that the assigned drive of the VHD after mounting is M and the system boots the boot partition to C), then run the Command Prompt or PowerShell as an administrator and run the following command in it:
BCDBOOT M:\WINDOWS /SC:
2. Editing and Maintenance of Multi-system Boot Menu
The editing and maintenance of the Windows multi-system boot menu mainly includes the adjustment of the menu order, the personal modification and editing, and the recovery after the menu is lost.
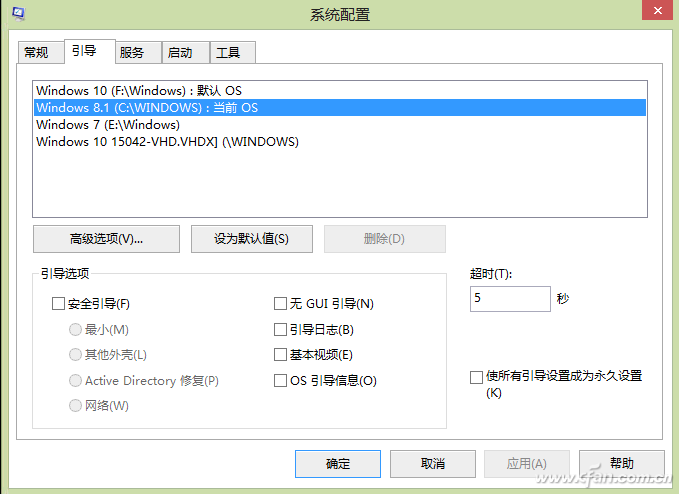
The adjustment of the Windows multi-system startup menu order can be done through the system configuration program. Press the Win+R key combination and run the MSCONFIG command. Click on the “Boot†tab. In the list, you can see the current status of the multi-system menu. Select the item you want to use as the first boot system, and click “Set as Defaultâ€. Press the button to set the selected system as the default first boot system. After the settings, click the “Apply†button to make the adjustment effective (Figure 4).
The above method can only directly set the default startup, if there is a need to adjust the order of other systems inconvenient. At this time, you can use the BCD "smart editing mode" of the BOOTICE tool to freely adjust the menu items. After selecting a menu item, you can use the "move up" and "move down" buttons to easily change the system items in the menu. The location (Figure 5).
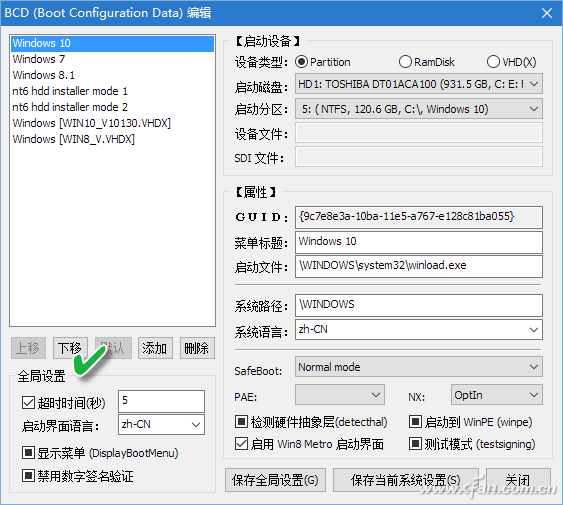
In addition to adding new menu items and changing the order of items, we can also customize the menu's name. If a new version of Windows 10 is newly installed on the basis of Windows 10, a multi-system is formed. If you do not pay attention to naming the system title as a simple string of "Windows 10," it is bound to cause two The Windows 10 startup item makes it impossible to distinguish between the two Windows 10 versions. In this case, through the BCD smart edit mode window, the necessary changes to the “menu titleâ€, plus the version number, will allow the boot menu to clearly identify different versions of Windows 10.
One trouble you may encounter when using multiple systems is the loss of system menu items or even the entire menu. Installing a lower version system after installing a higher version system, or using inappropriate third party tools, manually installing or deploying a system, using a tool software to modify or delete a multi-system menu file, etc., may result in the loss of multiple system menus or Error. In addition, formatting an important partition of the original system disk after starting the system with another boot disk may also result in the loss of multiple system menus. For whatever reason, as long as the files related to system startup have not been damaged and only the multi-system menu files have been damaged, the above tools can be used to manually retrieve lost menu items by adding them.
Tips:
We can even move the actual location of one system in multiple systems from one partition to another. Simply change the location of the partition's disk, boot partition, and device file through the BCD Edit menu.
3. Multiple system boot menu backup and restore
In order to facilitate the recovery after the menu is lost, it is better to back up the contents of the multi-system menu under normal circumstances, first export the menu text, and then use the above tools to manually edit the menu after the problem occurs, so that it can be retrieved more quickly and accurately. System menu.
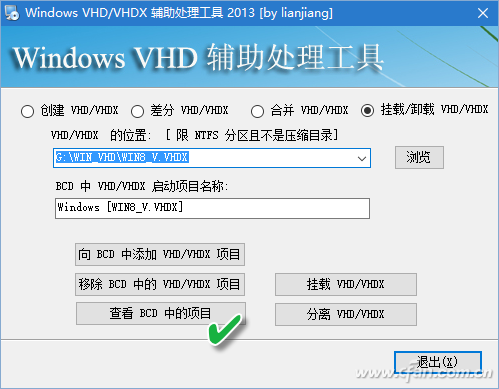
The multi-system menu backup can be completed by using the “view items in BCD†option of the Windows VHD auxiliary processing tool. Clicking this button will open the BCD menu in the notebook and save the contents of this menu as a text file for manual modification in the future. You can (Figure 6).
Tip: Backup and Restore Multiple System Menus Using Command Mode
The Windows multi-system boot menu backup can also be performed in the administrator command prompt window by executing the following command:
Bcdedit /export D:\BCDbackup\BCDbackup
When you need to restore, use the following command:
Bcdedit /import D:\BCDbackup\BCDbackup
Passive Matrix Oled,The Transparent Oled,Monitor Passive Matrix Oled,Display Passive Matrix Oled
Shenzhen Newvision Technology Co.Ltd , https://www.newvisionlcd.com